This Namaste Robot, whose mechanical frame can be made of recycled materials, monitors people within its 100cm range using an ultrasonic module.
Detecting anyone within this range, it greets the person with ‘Namaste’ symbolized by both hands joined together in traditional Indian greeting.
The robot is versatile and can be deployed in diverse settings such as business locations, parks, shops, etc, to extend greetings. Despite its primary function, the robot is designed to inspire modification for additional purposes.
For instance, envision the potential for adapting its technology for use near automatic gates at airports or garages.

Users have the flexibility to substitute the servo with various actuators for functions like automatically opening gates or doors. Alternatively, a larger servo may be attached to actuate gates or doors for automatic opening. The device is adaptable and can be repurposed for various applications.
However, our focus remains on demonstrating the sensing of human presence, activating the servo motor to move the robot’s hands, and welcoming people when someone approaches.
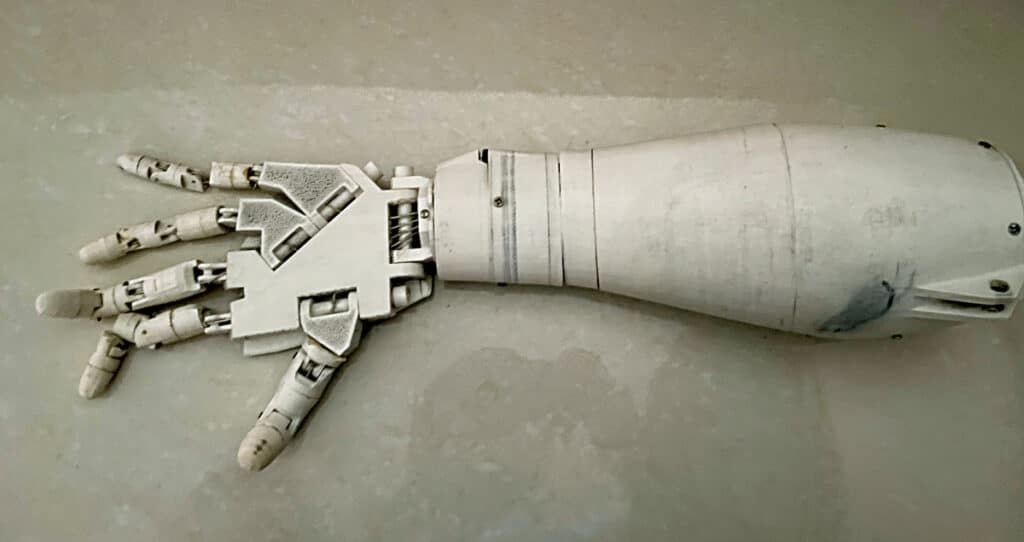
For the robot’s mechanical hand, users can purchase or 3D print a robot hand like the inMoov robot hand, or design a custom robot structure and body. Fig. 1 shows the author’s prototype of the inMoov hand.
| Bill of Materials | |
| Components | Quantity |
| Arduino Uno/Mega/Nano (MOD1) | 1 |
| Servo motor SG90 (S1, S2) | 2 |
| Ultrasonic sensor HC-SR04 (MOD2) | 1 |
| Mechanical body for robot | Optional |
| Jumper wires (male-to-male) | 12 |
| Breadboard | 1 |
Namaste Robot Circuit and Working
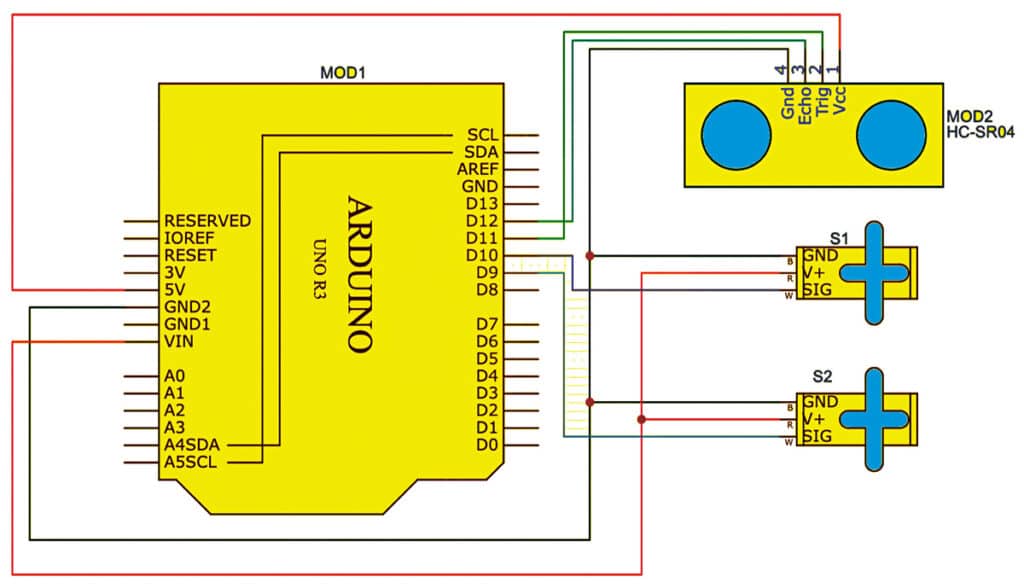
Fig. 2 illustrates the circuit diagram of the device, which is based on Arduino Uno technology. It comprises Arduino Uno (MOD1), an ultrasonic sensor HC-SR04 (MOD2), two SG90 servo motors (S1, S2), a mechanical body from recycled materials, a breadboard, and jumper wires.
Users have the option to replace the Arduino Uno with other boards such as Arduino Mega or Arduino Nano. A brief introduction to the components used in the robot is provided below.

Servo motor SG90: A servo motor is a specialized type of motor that rotates with great accuracy and high precision. In a servo motor, a control circuit continuously provides feedback on the current position of the motor shaft, enabling precise rotation. Servo motors are generally rated in kg/cm (kilogram per centimeter), with hobby servo motors rated at 3kg/cm, 6kg/cm, or 12kg/cm. This rating indicates the weight the servo motor can lift at a particular distance.
Arduino board: The Arduino microcontroller board is based on an ATmega microcontroller. It features digital input/output pins, analog inputs, a USB connection, a power jack, an ICSP header, and a reset button.
Ultrasonic sensor HC-SR04: The HC-SR04 is a distance-measuring sensor with a range of 2cm to 400cm. The sensor incorporates two ultrasonic transducers, one of which is a transmitter that sends ultrasonic sound pulses and the other a receiver that listens for reflected waves, essentially functioning as a sonar.
Code
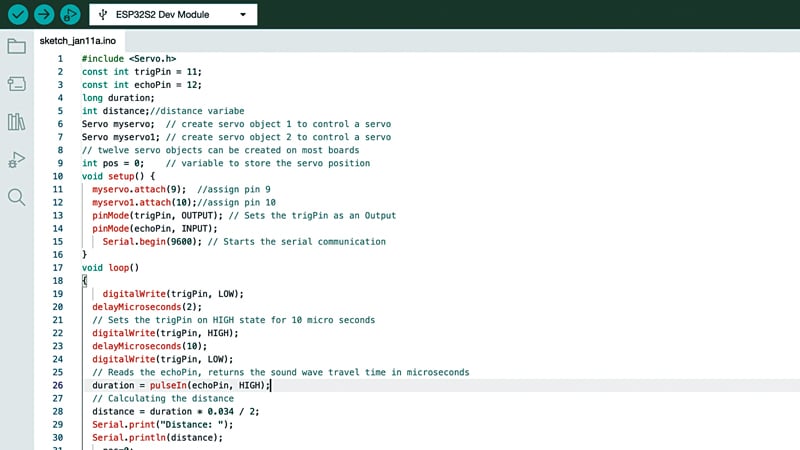
The code is built using the Arduino IDE. Initially, the servo.h library is employed to drive the servo, and then pins for the ultrasonic sensor are defined. Although any free pins can be used, pins D11 and D12 of Arduino Uno are used here as Trig (2) and Echo(3) pins of the ultrasonic sensor.
The Trig pin sends ultrasonic waves, and the Echo pin receives the waves. The time difference between sending and receiving is converted into distance. Consequently, the robot can sense someone approaching and, in response, either the servo motor moves to welcome or any actuator can replace the servo for the automatic opening of doors, windows, or garage gates.
In the setup function, the servo SIG pins of servo motors S1 and S2 are defined. Here D9 and D10 pins of Arduino are used, but any PWM pins can be utilized. In the loop function, the distance is checked, and if the distance is below the threshold value that can be set, the servo motor moves to welcome. Fig. 3 shows a snippet of the source code.

Mechanical Construction
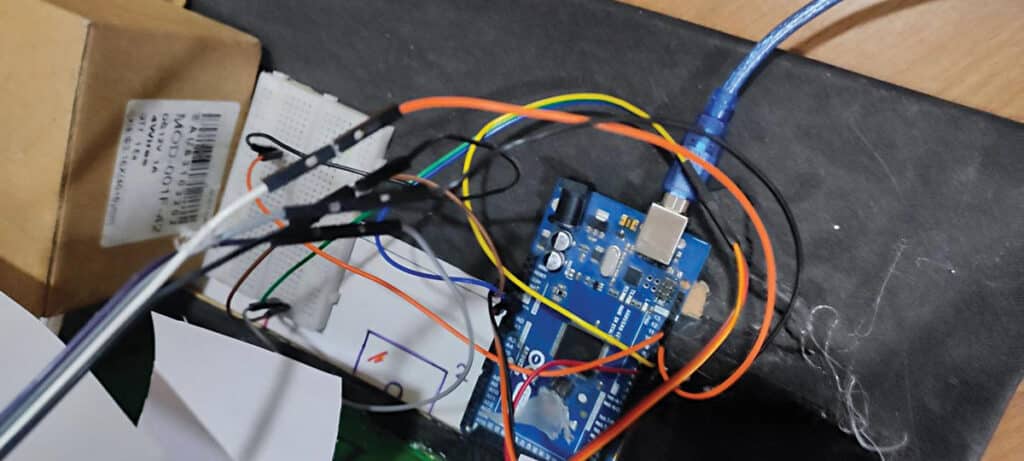
For the mechanical construction of the robot, you can design any body of your choice, purchase one from the market, or 3D print an open-source robot hand like the inMoov. For simulation and testing demo purposes, you can simply attach the paper-made hand to the servo shaft, as shown in Fig. 4.

Also Check: Interesting Arduino Projects
Testing
First, upload the source code into Arduino Uno using any desktop or laptop. Assemble the circuit on a breadboard or general-purpose PCB and complete the connections as per the circuit diagram in Fig. 2. The mechanical assembly of both hands should be your choice, and the robot should be installed at the entrance gate so that when someone passes near the sensor, the robot arms and the hands get activated for greeting.

The working of the robot is simple. When anybody comes in front of the ultrasonic sensor within a distance of 100cm, the servo moves the hands to say ‘Namaste.’ When the person moves away from the robot, the robot’s arms and hands move back to their normal position. The ultrasonic sensor acts as the eyes of the robot.
Fig. 5 shows the final assembly of the robot, which has been tested in various situations and was found working efficiently.
Navpreet Singh Tung is in-charge of the Artificial Intelligence and Robotics Lab at Sandeepani Gurukul in Pathankot, Punjab, India
The post ‘Namaste’ Robot To Greet Visitors Automatically appeared first on Electronics For You.
View more at https://www.electronicsforu.com/electronics-projects/namaste-robot.
Credit- EFY. Distributed by Department of EEE, ADBU: https://tinyurl.com/eee-adbu
Curated by Jesif Ahmed